Vaulting the Ceiling, Part I — Plans and Permits
Note: Part I of this story is moderately wonky and describes the design, planning, and permitting process for vaulting the ceiling, but doesn't actually depict any of the vaulting itself. If construction photos are more your thing, consider skipping straight to Part II.
Almost every change we've made to the house is intended to decrease its energy consumption, but we made one big move that would increase consumption, all else being equal: we vaulted the ceiling. Raising the ceiling in the "common area" (kitchen, entry, dining area, and living room) is about aesthetics and how it feels to be in the space.
We decided to vault the ceiling in the common area, outlined in the floor plan above.
I knew it would be a huge change with lots of implications, but felt — hoped — it would completely transform the main living area of the house.
Before the renovation, the common area had a flat, 8-foot popcorn ceiling. The dining area had no daylight and to me the ceiling felt low and oppressive.
Before the renovation, the dining area was very dark, with lots of glare from the kitchen. The space was hard on the eyes.
There were cabinets blocking the light from the single kitchen window to the west and inexplicable half walls with latticed screens blocking the light from the windows and sliding glass doors in the living room to the east.
Half walls with latticed screens separated the dining area from the living area and the entry area. I think semi-transparent screens can be done well. But this isn't that.
Removing these obstructions between the rooms and vaulting the ceiling to be parallel to the roof would open up and connect all these spaces together. Adding a skylight would bring more daylight to the dining area.
To envision what the space would look like with a vaulted ceiling and a skylight, I used the SketchUp model that I created to generate the floor plans. I made 3D interior views and tweaked the configuration to get a sense of the options for the vaulted ceiling. SketchUp does have daylighting functionality, but it's not great. To get a better sense of what the daylighting would actually look like at different times of the day and year, I exported the SketchUp model and uploaded it into a daylight simulator called "Daylight Visualizer" (available free from the Danish skylight manufacturer Velux). This application allowed me to generate still images and even animations of the space, and helped me with the placement and the sizing of the skylight. One thing I learned — a little skylight goes a long way.
The skylight in the exploratory simulation video above is on the western roof pitch. I later decided to move the skylight to the eastern pitch in order to avoid afternoon solar gains.
Vaulting the ceiling would require completely changing the roof structure in this part of the house, which originally looked like this:
View of the existing attic over the common area, looking northeast. The 6x13 beam runs across the bottom of the photo.
Pretty much everything you see in the photo above (excluding the rafters running along the roof) had to be removed in order to vault the ceiling.
The structure had pieces of wood called "purlins" than run across the middle of the rafters, supporting them.
Drawing of the existing ceiling and roof structure, looking north. Note the purlins supporting the 2x6 rafters mid-span. I think I left out some supports for the purlins in this drawing. There were regularly spaced supports resting on bearing walls or that giant 6x13 beam shown in the center-right.
The horizontal span from the ridge (the spine of the roof, where the rafters meet) to the exterior bearing walls is about 15 feet — too long for the 2x6 rafters to span by themselves.
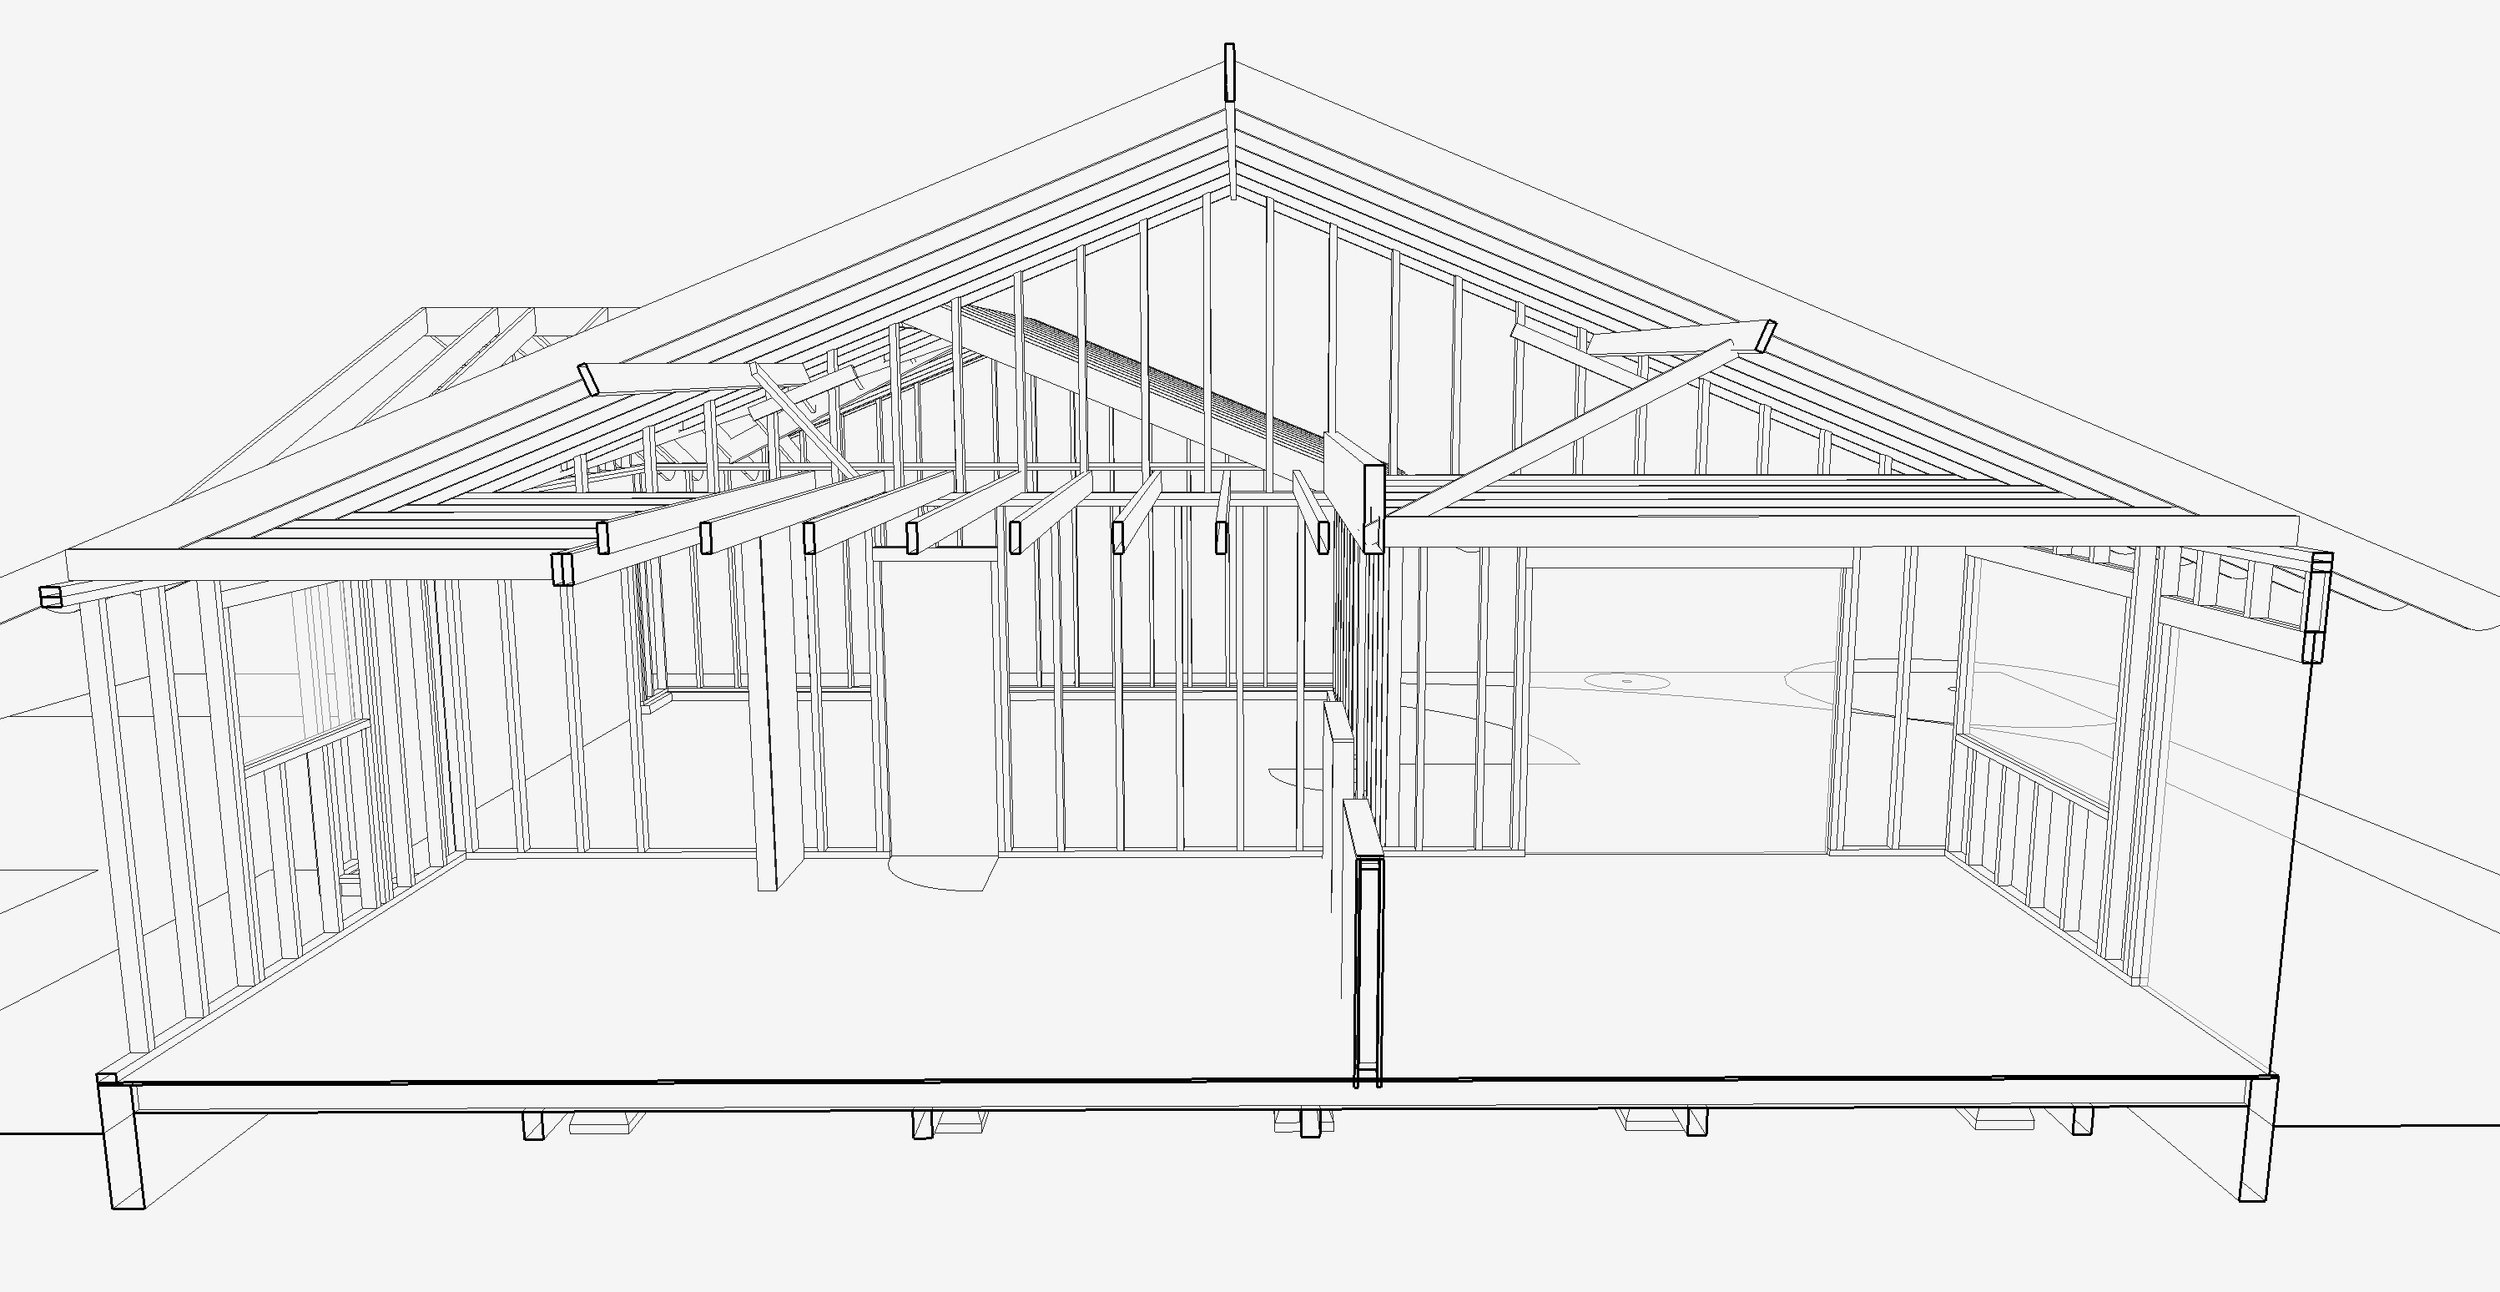
Sectional perspective (looking north) showing the pre-renovation roof structure of the common area. The purlins and all the ceiling joists would need to be removed in order to vault the ceiling.
The purpose of the purlins is to support the rafters mid-span, turning that 15-foot span into two 7.5-foot spans that the 2x6 rafters can handle. These purlins are themselves carried by short, interspersed supports that extend roughly perpendicular to the slope of the roof, which in turn rest on a bearing wall or another structural member. In the living room, because the space was open and the purlins had no bearing wall, they rested instead on a massive 20-foot 6x13 solid Douglas fir beam that spanned between two bearing walls.
These purlins, their supports, and all the ceiling joists would need to be removed in order to vault the ceiling, and all the loads that they carried would have to be transferred from the roof down to the ground in some other way. I had some ideas for how to do this, but I did not know if these ideas were any good; I needed help from a structural engineer. The challenge with finding a structural engineer is that this is such a small residential project, and the architect is also the homeowner and doesn't really know what he's doing, so there would need to be a fair amount of hand holding. I needed to find someone who was competent and reliable, but who would also be amenable to working with a novice architect.
I found a few helpful resources while trying to understand exactly what I was getting myself into. One was a post from another DIY home renovation blog, although they didn't actually DIY the vaulting part. Another was a Fine Homebuilding article from 2007 called Ceiling Remodel: From Flat to Cathedral, written my Mike Guertin (behind a paywall, sorry). It gave a sense of what the demolished ceiling would look like, what some of the structural options and considerations are, advice for fabricating vent/insulation combo out of rigid foam, as well as guidance on when hiring a structural engineer is necessary. In our case, the engineer was definitely necessary.
My wife said this block of text is too long, so I broke it up with this picture of her.
I searched for local engineers online and looked at reviews, then contacted a local firm to schedule an appointment and put some drawings together for them. I arrived at the meeting with drawings and some anxiety. I attempted to explain the project and I handed the engineer my drawings and he grimaced. "What is this?" he exclaimed (paraphrased). "This is a mess. Why did you include every stud?," and so on. The conversation didn't go well and was kind of embarrassing, but it was a learning experience. The engineer conveyed that he was feeling put out, but still made an effort to make sense of what we were trying to do. He took one of my floor plans and drew on it by hand, giving a rough outline of the solution he had in mind, along with a quote for a full set of permit drawings, along with a reduced price if I were willing to go to the permitting office myself to discuss revisions and the like.
This all seemed reasonable, but I thought I would get another bid just to get a sense of the range of options and to feel like I was doing due diligence. Also, although the engineer's disdain was not entirely unmerited, after that first meeting I wasn't convinced that he was the guiding hand I was looking for. I found another engineer who agreed to come out to the house to meet. This second engineer was more easy-going and supportive of my DIY approach. He cautioned that this was a substantial project that I was undertaking, and wanted to make sure I was up for it. He offered to give guidance if I had questions even after his drawings were done and the permit issued, and his price was reasonable (around $1500). I know that it's best practice to get at least three bids, but I felt comfortable with this second engineer and decided to move forward with him.
Looking back now, I still think hiring him was a good decision. There were times when his drawings had missing details or sections that were just boilerplate images from other projects that didn't actually match my project (!). This was a little concerning and annoying, but his load calculations seemed thorough and the details for the key structural details — structural member specs and spacing, brackets specs, fastener spacing, et cetera — were good enough. I brought the structural and architectural drawings to my local city's permitting office, and after a couple rounds of feedback and revision, they were approved.
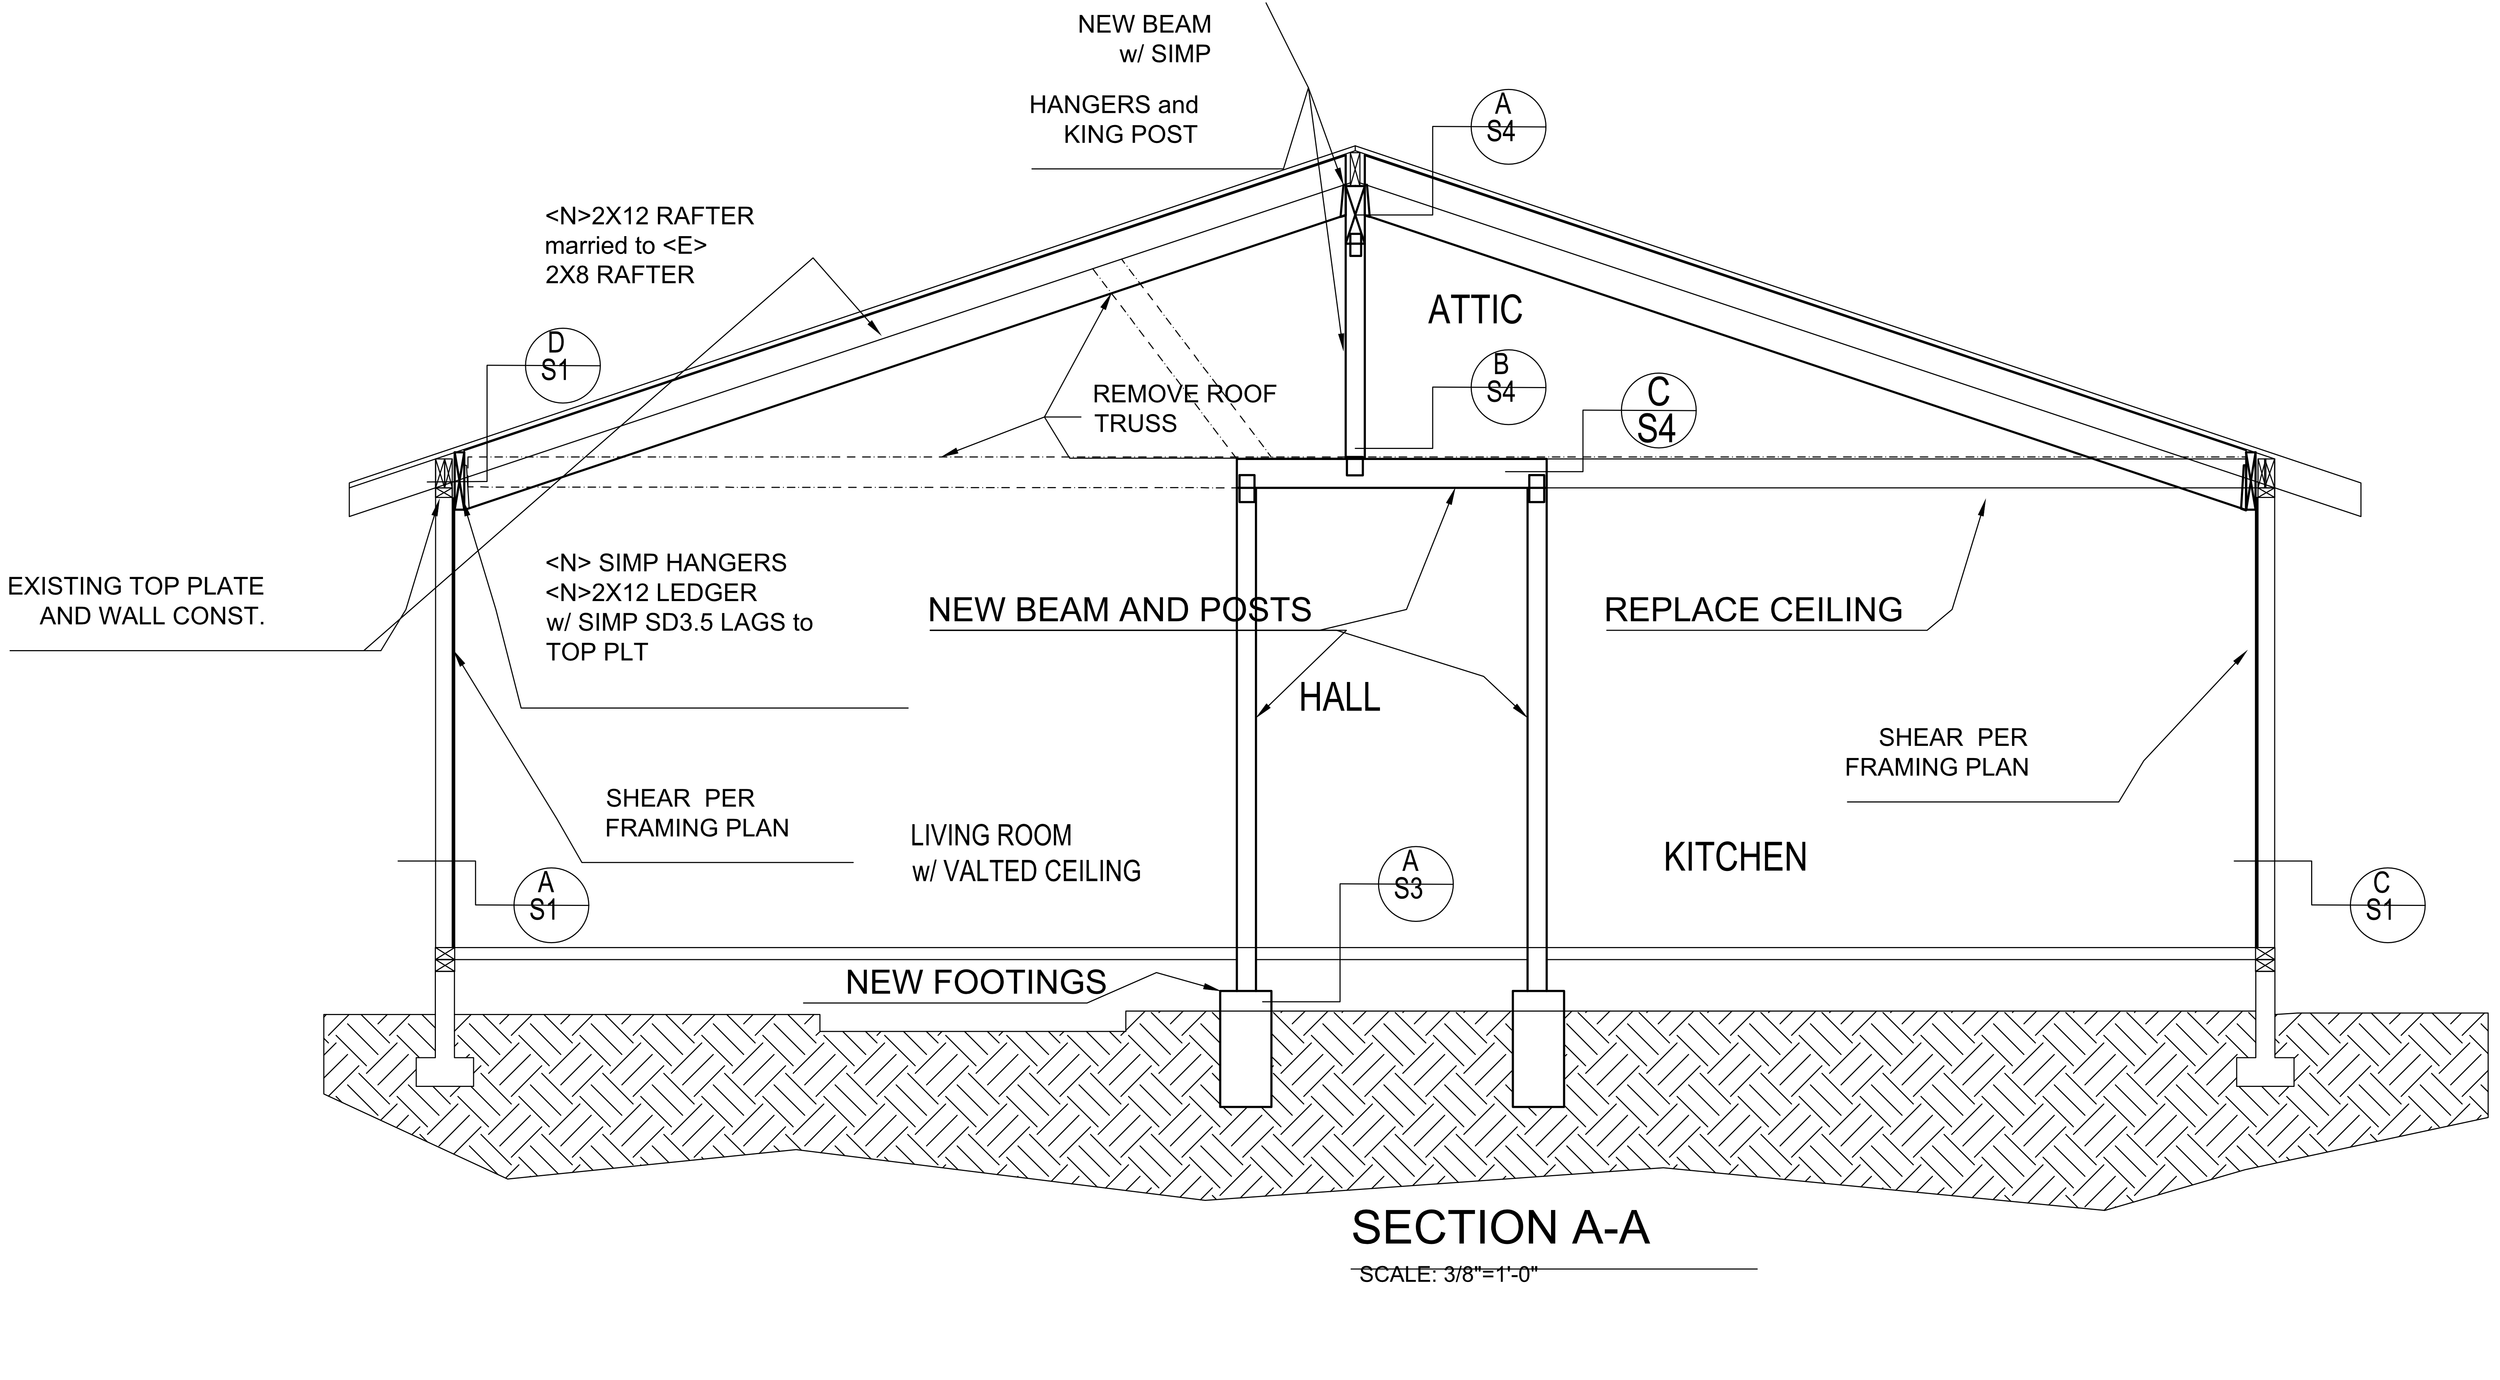
A cross section of the common area from the structural engineer's construction drawings, specifying how the new vaulted ceiling would be supported.
The new structure for the vaulted ceiling would entail a 4x12 structural ridge beam. The existing ridge board merely tied the rafters together — it didn't actually support the roof. This new ridge beam (labeled "A-S4" in structural drawing) would carry the roof, and would be installed below the ridge board. New 2x12 rafters would be attached to the sides of ("sistered" to) the existing 2x6 rafters. These new rafters would have to be notched to rest on the new ridge beam, and would be attached to the ridge beam and board with special structural brackets and an incredible quantity of nails. On the other end they would be supported on the bearing wall via a ledger board — basically a 2x8 attached to the top part of the wall using huge, beefy screws called "lag bolts". The new rafters would have to be notched to rest partially on the top plate and partially by special brackets called "joist hangers", attached to the ledger board. The ridge beam itself would be supported by three posts — one at each end and one mid-span.
Three 4x4 posts support the new ridge beam. The north post is embedded in the wall, but the other two posts are directly over a hallway.
Each post is 4x4 inches. It's amazing how much axial load wood can take. Three measly 4x4 posts can support the entire roof for that side of the house?!? (Yes, apparently.)
These posts have to take the load of the roof to the ground. The post on the northern end of the house is straightforward; it's embedded in the exterior wall and can extend straight from the ridge beam to the bottom plate of the wall which is in turn supported by the concrete stem wall. The other two posts are directly above the hallway, and their load has to be distributed by beams that themselves have support posts at either end. These four posts would penetrate the floor and rest directly on brackets embedded in 18x18x18 concrete footings poured in the crawl space ground for this very purpose. Sounds like fun, eh?
Okay, time to see how all this looks in real life. Check out Part II to read how the new vaulted ceiling was constructed.
READ MORE:


